
Using the Twiddler 4
Using the Twiddler 3
Twiddler Tuner
Typing Tutor
Twiddler Technical
Twiddler Legacy Instructions
Using the Twiddler 4
Using the Twiddler 3
Twiddler Tuner
Typing Tutor
Twiddler Technical
Twiddler Legacy Instructions
Editing your Twiddler Config is a very simple procedure:
There is a lot of information on this screen so, at first, it can look a bit intimidating. Once you know what everything means you will see how easy it is to create, edit and delete chords. Let's break this page down into its component sections.


Located at the top of the screen, the File Bar indicates which Config file you are currently editing - shown in the black text box (twiddler_0). To the left of the file name is the version of the Config file you are editing (v6). Older firmware versions use a different config format. The Left Pointing Arrow brings you back to the main page.

The Settings Bar allows you to change settings for the configuration file and editor.
The First item is the download button. This downloads the current config to your host device. By clicking on the pull down a sub menu appears allowing you to specify in which config slot you would like this to be saved. The config file will be downloaded with the appropriate name.

NOTE: if 1.cfg already exists in the download directory, some operating systems will automatically re-name the file 1 (2).cfg. The Twiddler requires that the naming convention of 1.cfg, 2.cfg and 3.cfg be maintained. Copying 1 (2).cfg or some variant will cause the Twiddler to ignore these files.

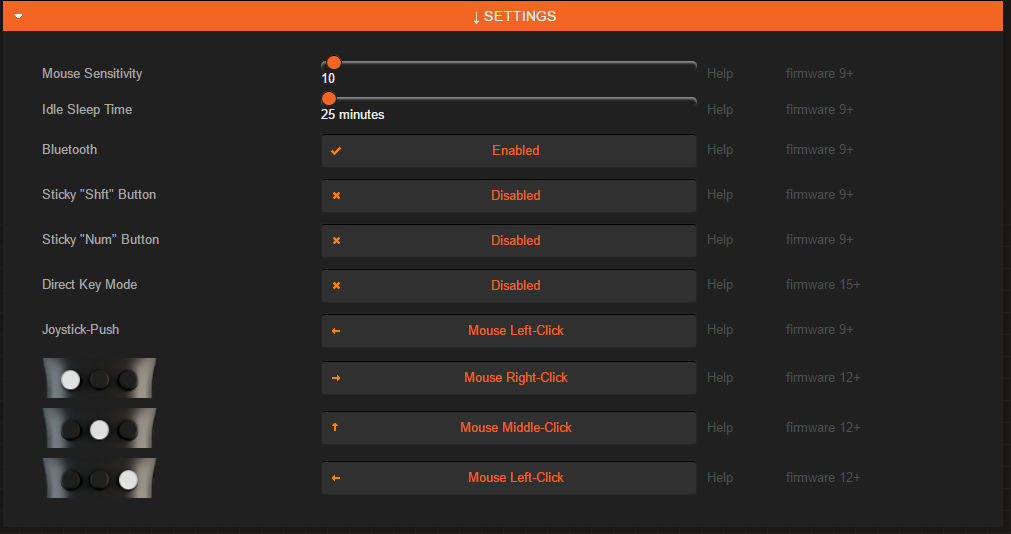
Clicking on the Settings Button opens a slide out window that gives you access to some of the “deeper” settings of the Twiddler.

Nav Mouse Click allows you to specify the action of clicking the Touchpad (Twiddler 4) or Joystick (Twiddler 3).
The Bluetooth checkbox allows you to power off the Bluetooth radio completely.
Direct Key Mode sends bounce and debounce states to the host computer. Used when you need to completely emulate a standard keyboard. No chording is possible in this mode.
Mouse Sensitivity slide allows you to modify how sensitive you want the mouse input to be.
Idle Time until Sleep sets the time the Twiddler will wait until it goes into sleep mode. Default is 1 minute. The longer the Idle Time, the larger the impact on battery life.

Classic Twiddler Notation has been around since the advent of the Twiddler. Twiddler 4 eliminated all of the chording limits imposed by previous versions of the Twiddler. The T4 notation was devised to clearly represent chording without limits. Use this button to toggle the display of T4 and Classic notation in the chord table.

Use this button to globally swap all Left and Right keypresses in the config. Some people like this if they are moving the Twiddler to their other hand.

Use this syntax to embed keystrokes that you cannot get by pressing a key on a regular keyboard. The Shift key is a good example. Pressing it on your keyboard sets a modifier flag when another key is pressed so it is not picked up by itself. If you want to use the Left Shift key in a chord just type in <Left Shift> _keys you want shifted_ </Left Shift>

The Settings Editor allows you to configure general usage parameters for your Twiddler. Each of these settings are specific for the twiddler.cfg file. Enabling Sticky Keys, for example, does not enable Sticky Keys all the time on the Twiddler. Sticky Keys will only be enabled when this particular twiddler.cfg file is used.
Click on the Settings Bar to unroll the menu.
Use this setting to slow down or speed up mouse movement. 1 is the fastest, 255 is the slowest and 128 is the default.
After the set period of time, the Twiddler will power down the Bluetooth Radio, disconnect from the host device, and go into a very low powered Sleep mode. Valid Settings are from 2 minutes to 1000 minutes. Default is 5 minutes. This should be the way you power down the Twiddler3 in normal use conditions. Powering Down with the switch should only be used in transportation and shipping situations.
Note: estimated battery life will decrease if the value is set greater than 5 minutes and increase if the value is set to less than 5 minutes.
Toggle this setting to turn on or turn off the Bluetooth Radio. Toggling this setting to “Disabled” will completely power down the Bluetooth Radio and stop it from emitting any RF. Default mode is “Enabled”.
Enable these to make Num act as Num Lock and Shft act as Caps Lock with a single key press. More information here: Sticky Keys
Enable to make keys respond like a standard keyboard. Key up and Key down commands are sent to the host. This limits the number of active keys to 15 (12 finger keys + 3 mouse buttons). This feature is normally enabled to use the Twiddler as a keyboard replacement for software that has shortcuts that rely on Press and Hold keystrokes.
Pressing down, or clicking, the Mouse Stick can send either a Left or Right click. Use this setting to send the appropriate click.
Each of the 3 mouse buttons can be configured to send either their respective mouse clicks or keystrokes to the host.
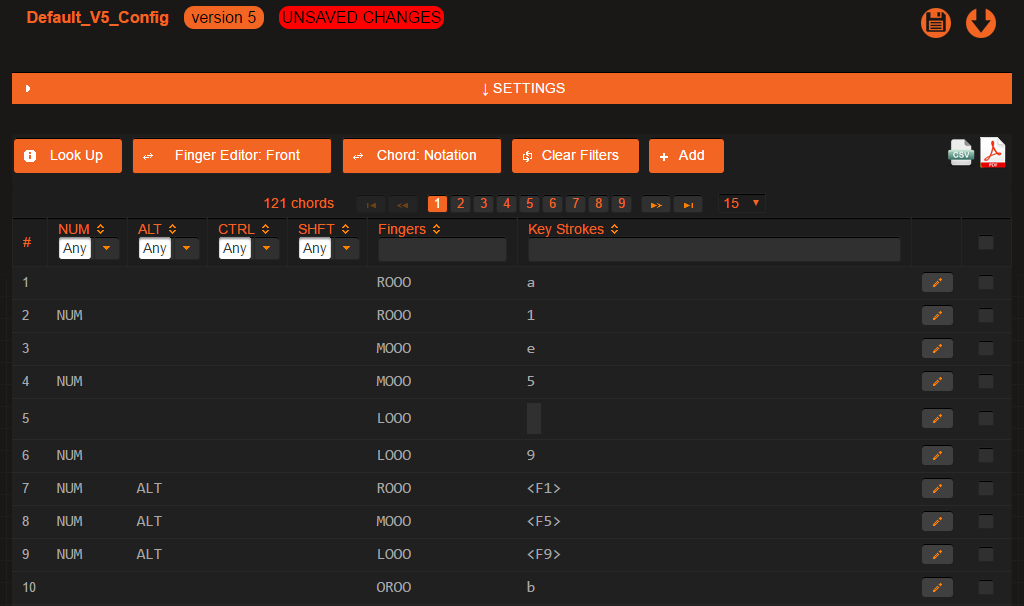
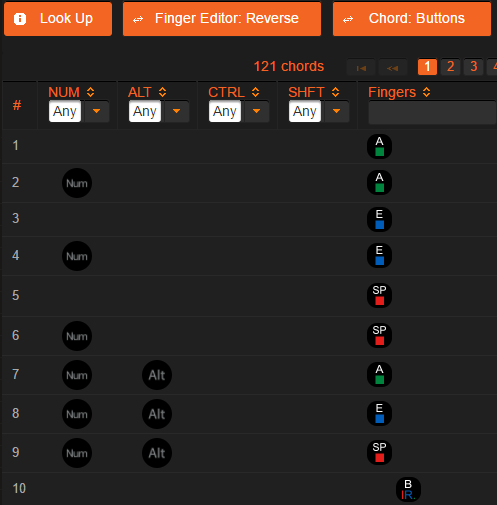
The Keystroke Editor is where you define all the different chords you would like to use. Every chord starts here.
The Look Up Button displays a syntax list for expressing non-visible key codes and modifiers in the Keystroke Editor area.
This button toggles the display orientation of the finger keys when creating a chord.
Front shows the layout with the keys pointing towards you as if looking at them.
While Reverse shows the layout with the keys pointing away from you as if looking through the Twiddler. 
This button toggles how the chord notation is displayed.
Notation shows the standard Twiddler chord notation
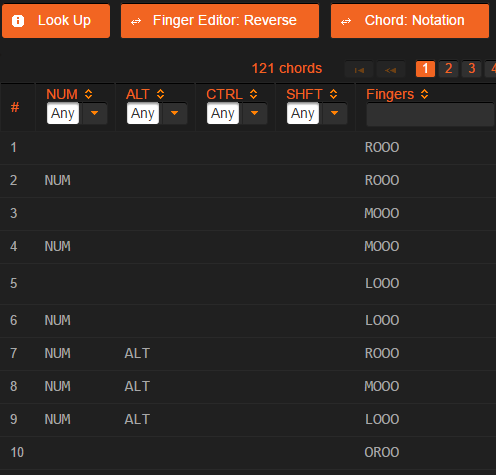
Buttons shows the buttons used on the Twiddler.
This button clears all the filters set in the top row.
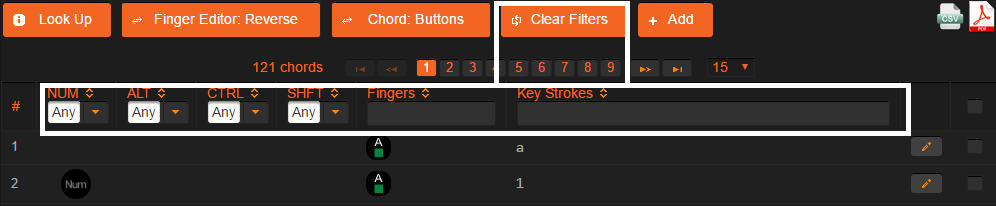
Click the Add Button to create a new chord.
A new blank line will be created in the first row of the table.
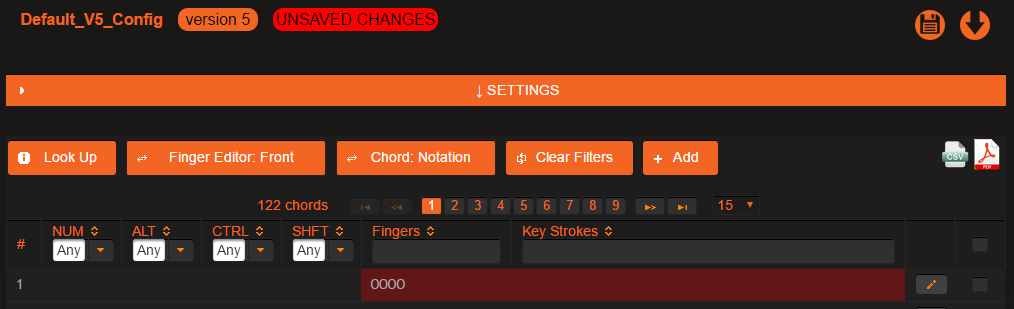
You will notice that a new row is inserted into the table below. It is always designated chord O OOOO as there are no keys assigned to that chord. Click here for a detailed description on Chord Notation. There is also a red box to highlight that this is your new chord placeholder. Click on the Edit Button  in the new chord row to begin editing. A Popup window will appear - the Keystroke Editor.

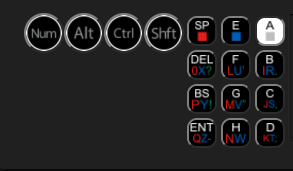
There are two parts of the Keystroke editor, on the Left, the chord assignment and, on the right, the keystroke text box. To create a Chord, click on the buttons you would like to assign to this chord. The keys will switch from Black to White to indicate that they are active. You can have a maximum of one key active per row and four per column selected. The Num, Alt, Ctrl and Shft buttons, at the top of the Twiddler, are Modifiers and can be added to the Chord and are not part of the maximum key limitation.
Once you have settled on a Chord, use the text box in the Keystrokes area to enter in your desired character string.
To enter special non-typable keys, click the Lookup Button to access a list of all the special keys available.
eg: CTRL-C would be written as: <Right Ctrl>c</Right Ctrl>
Other special keys only require a beginning tag as they are only on character.
eg: <F1> issues the F1 key. No ending tag </> is needed.
Note: You do not have to specify a unique chord for capital letters. Holding the SHFT key down while pressing the appropriate single character chord will produce a capital of that character. R000 will produce “a”. S R000 will produce “A”. S R000 does not have to be explicitly entered into the Chord List.
Once you have completed composing your chord, click on the Apply button to add it to the Chord List on the right. You will see the new chord appear in the table in orange.
If everything looks good and you are done editing, click the Save button in the File Bar to Save your changes to the Twiddler Cloud. Don't forget to download your updated file to the Twiddler by clicking on the download button in the File Bar.
You can download a CSV or PDF version of the complete chord list by clicking the appropriate icon beside the Chord List header.